![[Next Step] 10장 새로운 MVC 프레임워크 구현을 통한 점진적 개선](https://img1.daumcdn.net/thumb/R750x0/?scode=mtistory2&fname=https%3A%2F%2Fblog.kakaocdn.net%2Fdna%2Fzt2dd%2FbtsAGQHeTxS%2FAAAAAAAAAAAAAAAAAAAAANH0oyLVbIjaPPYb0mECx4fBo6astjFvEtl72Lvqpj4G%2Fimg.png%3Fcredential%3DyqXZFxpELC7KVnFOS48ylbz2pIh7yKj8%26expires%3D1772290799%26allow_ip%3D%26allow_referer%3D%26signature%3DttO71nwEqzC3bTWRoBi169LGnZ8%253D)


목표✨ (p338)
① 레거시 MVC프레임워크와 애노테이션 기반의 새로운 MVC 프레임워크가 동시에 서비스 가능하도록 구현
② 인터페이스로 추상화 가능한 부분을 찾아 2개의 프레임워크가 공존 가능하도록 리팩토링 수행
10.1 MVC 프레임워크 요구사항 3단계
10.1.1 요구사항 (p335)
아래 RequestMapping 코드를 보면 직접 요청 URL과 컨트롤러를 추가 해야 하는 불편함이 있다. 서블릿과 같이 애노테이션을 활용해 설정을 추가하고 서버가 시작할때 자동으로 매칭되도록 개선해 본다. (힌트: @Controller 애노테이션을 추가하고, 자바 리플렉션을 활용)

10.1.2 자바 리플렉션(p340)
Hint
① java.lang.Class API의 getConstructors(), getMethods(), getFields()는 public Constructor, Method, Field에만 접근 가능하다
② private, protected 접근 제어자에 대해서도 정보를 가져오고 싶으면 getDeclaredConstructors(), getDeclaredMethods(), getDeclaredFields() 를 사용해야 한다
참고. 개인 포스팅
https://dev-ljw1126.tistory.com/407
[Java] Reflection API 테스트 학습(with Baeldung)
목차 *테스트 코드 작성시 JUnit5, Assertj 사용 Baeldung 테스트 학습 class name 활용하여 인스턴스 생성하기 Job 인터페이스 public interface Job { String getJobType(); } MaintenanceJob 클래스 public class MaintenanceJob imp
dev-ljw1126.tistory.com
예제1. Junit3Test 클래스에서 test로 시작하는 method를 실행시킨다 (이때 Junit3TestRunner 클래스에 답안 작성한다)
public class Junit3Test {
    public void test1() throws Exception {
        System.out.println("Running Test1");
    }

    public void test2() throws Exception {
        System.out.println("Running Test2");
    }

    public void test3() throws Exception {
        System.out.println("Running Test3");
    }
}
*JUnit3명칭은 테스트가 3개라는 뜻인거 같다, JUnit3을 뜻하는 것은 아니다🙅♂️
테스트 코드
import java.lang.reflect.InvocationTargetException;
import java.lang.reflect.Method;

public class Junit3TestRunner {

    @Test
    void run() throws InvocationTargetException, IllegalAccessException, InstantiationException {
        Method[] methods = Junit3Test.class.getDeclaredMethods();

        Junit3Test object = clazz.newInstance(); // *.newInstance() deprecated from java 9

        for(Method method : methods) {
            if(method.getName().startsWith("test")) {
                method.invoke(object);
            }
        }
    }
}
참고. invoke()로 실행시키는데 이때 obj는 해당 클래스 인스턴스이고, 뒤에 가변인자는 Method 실행에 필요한 파라미터를 추가한다

예제2. Junit4Test 클래스에서 @MyTest 애노테이션이 있는 모든 메서드를 실행한다 (이때 Junit4TestRunner 클래스에 답안 작성한다)
애노테이션 정의
@Target(ElementType.METHOD)
@Retention(RetentionPolicy.RUNTIME)
public @interface MyTest {
}
예제 코드 작성
public class Junit4Test {

    @MyTest
    public void one() throws Exception {
        System.out.println("Running Test1");
    }

    @MyTest
    public void two() throws Exception {
        System.out.println("Running Test2");
    }

    public void testThree() throws Exception {
        System.out.println("Running Test3");
    }
}
테스트 코드
public class Junit4TestRunnger {

    @Test
    void run() throws ClassNotFoundException, InvocationTargetException, IllegalAccessException {
        Junit4Test object = new Junit4Test();

        Class<Junit4Test> clazz = (Class<Junit4Test>) Class.forName("core.ref.Junit4Test");
        Method[] declaredMethods = clazz.getDeclaredMethods(); // 해당 클래스에 선언된 메서드

        for(Method method : declaredMethods) {
            if(method.isAnnotationPresent(MyTest.class)) {
                method.invoke(object);
            }
        }
    }
}
예제3. 생성자가 있는 클래스(User)의 인스턴스 생성하기
public class User {
    private String userId;
    private String password;
    private String name;
    private String email;

    public User(String userId, String password, String name, String email) {
        this.userId = userId;
        this.password = password;
        this.name = name;
        this.email = email;
    }

   // getter, setter
}
테스트 코드
@Test
void createInstance() throws ClassNotFoundException, InvocationTargetException, InstantiationException, IllegalAccessException {
    Class<User> clazz = (Class<User>) Class.forName("next.model.User");
    Constructor<User>[] constructors = (Constructor<User>[]) clazz.getDeclaredConstructors();

    User user = newInstanceWithConstructorArgs(constructors[0]);

    assertThat(user).isNotNull();
    assertThat(user).extracting("userId", "password", "name", "email")
            .containsExactly("jinwoo3", "1234", "jinwoo", "jinwoo@gmail.com");
}

private User newInstanceWithConstructorArgs(Constructor constructor) throws InvocationTargetException, InstantiationException, IllegalAccessException {
    return (User) constructor.newInstance("jinwoo3", "1234", "jinwoo", "jinwoo@gmail.com");
}
예제4. private 필드에 접근하기
public class Student {
    private String name;
    private int age;

    public String getName() {
        return name;
    }

    public int getAge() {
        return age;
    }
}
테스트 코드
@Test
void accessPrivateField() throws NoSuchFieldException, IllegalAccessException {
    Class<Student> clazz = Student.class;

    Student student = new Student();

    Field name = clazz.getDeclaredField("name");
    name.setAccessible(true);
    name.set(student, "진우");

    Field age = clazz.getDeclaredField("age");
    age.setAccessible(true);
    age.set(student, 30);

    assertThat(student).extracting("name", "age")
            .containsExactly("진우", 30);
}
10.2 MVC 프레임워크 구현 3단계
목표✨
레거시 MVC프레임워크와 애노테이션 기반의 새로운 MVC 프레임워크가 동시에 서비스 가능하도록 구현한다
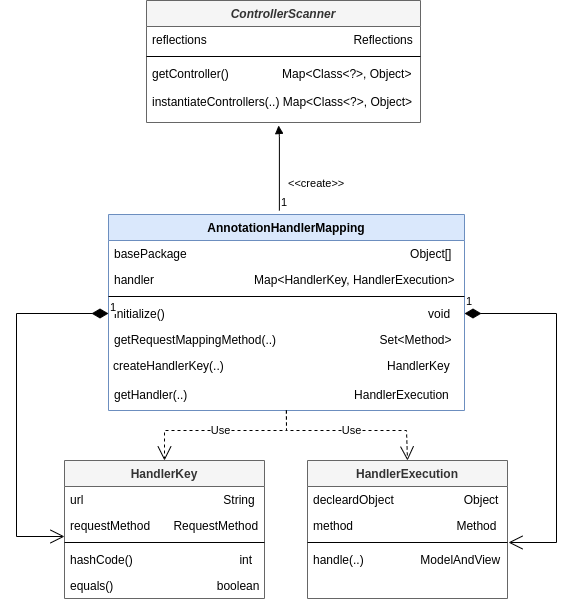
① ControllerScanner
@Controller 애노테이션이 붙은 클래스를 찾아 인스턴스화 한다
② AnnotationHandlerMapping
- initailize() 실행시 Map<HandlerKey, HandlerExecution> 인스턴스 정보를 초기화 수행
- 사용자 요청시 요청 URL과 Request Method 정보에 맞는 @RequestMapping Method Mapping 정보를 찾아 실행
③ HandlerKey
@RequestMapping 애노테이션 메타 정보인 요청 URL과 Request Method 정보 가진 추상화 객체
④ HandlerExecution
HandlerKey에 Mapping 되는 @RequestMapping Method 정보 가지는 추상화 객체
- decleardObject : @RequestMapping이 선언된 클래스의 인스턴스, 리플렉션 API 실행시 필요
- method : 실제 실행할 @RequestMapping 애노테이션이 붙은 method
결과적으로 사용자 요청시 HandlerKey에 해당하는 HandlerExecution을 찾아 실행하고 결과값을 리턴하는 방식이다
@Controller, @RequestMapping, enum RequestMethod 생성
@Target(ElementType.TYPE)
@Retention(RetentionPolicy.RUNTIME)
public @interface Controller {
    String value() default "";
}
@Target({ElementType.TYPE, ElementType.METHOD})
@Retention(RetentionPolicy.RUNTIME)
public @interface RequestMapping {
    String value() default "";

    RequestMethod method() default RequestMethod.GET;
}
public enum RequestMethod {
    GET, HEAD, POST, PUT, PATCH, DELETE, OPTIONS, TRACE
}
ControllerScanner 클래스 생성
Reflection API 활용하여 basePackage 경로에 @Controller 붙은 클래스 찾아 인스턴스와 한다
public class ControllerScanner {
    private static final Logger log = LoggerFactory.getLogger(ControllerScanner.class);

    private Reflections reflections;

    public ControllerScanner(Object... basePackage) {
        reflections = new Reflections(basePackage);
    }

    public Map<Class<?>, Object> getController() {
        Set<Class<?>> annotated = reflections.getTypesAnnotatedWith(Controller.class);
        return instantiateControllers(annotated);
    }

    public Map<Class<?>, Object> instantiateControllers(Set<Class<?>> annotated) {
        Map<Class<?>, Object> controllers = Maps.newHashMap();
        try {
            for (Class<?> clazz : annotated) {
                controllers.put(clazz, clazz.newInstance());
            }
        } catch (IllegalAccessException | InstantiationException e) {
            log.error(e.getMessage());
        }

        return controllers;
    }
}
ControllerScannerTest 작성
@Controller
public class MyController {
	//..
}
테스트 코드
class ControllerScannerTest {
    private ControllerScanner cs;

    @BeforeEach
    public void setup() {
        cs = new ControllerScanner("core.nmvc");
    }

    @Test
    void init() throws ClassNotFoundException {
        Map<Class<?>, Object> controllerMap = cs.getController();

        assertThat(controllerMap.get(Class.forName("core.nmvc.MyController")))
                .isNotNull()
                .isInstanceOf(MyController.class);
    }
}
HandlerKey, HandlerExecution 클래스 정의
public class HandlerKey {
    private String url;
    private RequestMethod requestMethod;

    public HandlerKey(String url, RequestMethod requestMethod) {
        this.url = url;
        this.requestMethod = requestMethod;
    }

    public String getUrl() {
        return url;
    }

    public RequestMethod getRequestMethod() {
        return requestMethod;
    }

    @Override
    public boolean equals(Object o) {
        if (this == o) return true;
        if (o == null || getClass() != o.getClass()) return false;
        HandlerKey that = (HandlerKey) o;
        return Objects.equals(url, that.url) && requestMethod == that.requestMethod;
    }

    @Override
    public int hashCode() {
        return Objects.hash(url, requestMethod);
    }
}-Mapping의 키로 사용될 HandlerKey 의 경우 @RequestMapping 애노테이션이 설정되어 있는 메소드 정보를 가져야 한다
-그리고 hashCode(), equals() method가 오버라이딩 되어 있어야 한다
public class HandlerExecution {

    private static final Logger log = LoggerFactory.getLogger(HandlerExecution.class);

    private Object declearedObject;
    private Method method;

    public HandlerExecution(Object declearedObject, Method method) {
        this.declearedObject = declearedObject;
        this.method = method;
    }

    public ModelAndView handle(HttpServletRequest request, HttpServletResponse response) {
        try {
            return (ModelAndView) method.invoke(declearedObject, request, response);
        } catch (IllegalAccessException | InvocationTargetException e) {
            log.error("{} method invoke fail, error message : {}", method, e.getMessage());
            throw new RuntimeException(e.getMessage());
        }
    }
}
-Mapping key에 해당하는 값에 저장되는 메소드 정보는 자바 리플렉션으로 해당 메소드를 실행할 수 있는 정보를 가져야 한다.
-Object declearedObject : 클래스 인스턴스, Method : 실행 메서드
-handle() 메소드에서 Reflection API로 @RequstMapping method를 실행한 결과값을 반환한다
AnnotationHandlerMapping 클래스 생성
- initilaize() 실행하여 애노테이션 기반의 Mapping 정보를 Map 자료 구조에 담는다
- 사용자 요청 정보와 mapping(HandlerKey)되는 HandlerExceution 실행 (@RequestMapping 가진 실제 method)
public class AnnotationHandlerMapping {
private static final Logger log = LoggerFactory.getLogger(AnnotationHandlerMapping.class);
private Object[] basePackage;
private Map<HandlerKey, HandlerExecution> handler = Maps.newHashMap();
public AnnotationHandlerMapping(Object... basePackage) {
this.basePackage = basePackage;
}
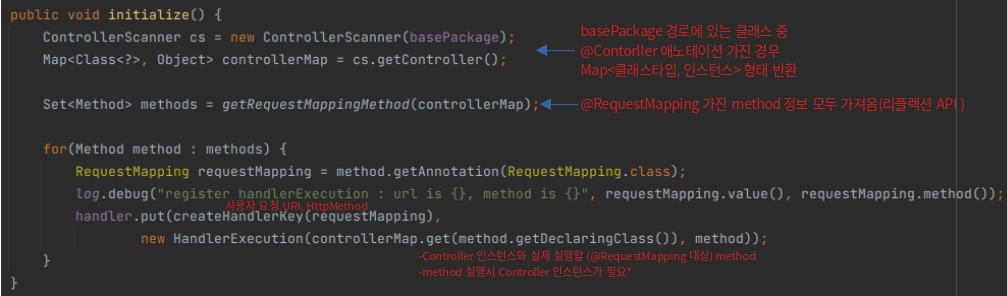
public void initialize() {
ControllerScanner cs = new ControllerScanner(basePackage);
Map<Class<?>, Object> controllerMap = cs.getController();
Set<Method> methods = getRequestMappingMethod(controllerMap);
for(Method method : methods) {
RequestMapping requestMapping = method.getAnnotation(RequestMapping.class);
log.debug("register handlerExecution : url is {}, method is {}", requestMapping.value(), requestMapping.method());
handler.put(createHandlerKey(requestMapping),
new HandlerExecution(controllerMap.get(method.getDeclaringClass()), method));
}
}
private static Set<Method> getRequestMappingMethod(Map<Class<?>, Object> controllerMap) {
Set<Method> requestMappingMethod = Sets.newHashSet();
for(Class<?> clazz : controllerMap.keySet()) {
requestMappingMethod.addAll(ReflectionUtils.getAllMethods(clazz, ReflectionUtils.withAnnotation(RequestMapping.class)));
}
return requestMappingMethod;
}
private HandlerKey createHandlerKey(RequestMapping requestMapping) {
return new HandlerKey(requestMapping.value(), requestMapping.method());
}
public HandlerExecution getHandler(HttpServletRequest request) {
String requestURI = request.getRequestURI();
RequestMethod requestMethod = RequestMethod.valueOf(request.getMethod().toUpperCase());
log.debug("requestUri : {}, requestMethod : {}", requestURI, requestMethod);
return handler.get(new HandlerKey(requestURI, requestMethod));
}
}
참고.
기존 RequestMapping 클래스명을 LegacyHandlerMapping으로 rename refactoring
(생략)
HandlerMapping 인터페이스 정의
AnnotationHandlerMapping 클래스와 LegacyHandlerMapping 클래스에서 구현하여 사용
public interface HandlerMapping {
    Object getHandler(HttpServletRequest request);
}
AnnotationHandlerMapping 클래스
public class AnnotationHandlerMapping implements HandlerMapping {
    [..]

    public HandlerExecution getHandler(HttpServletRequest request) {
        String requestURI = request.getRequestURI();
        RequestMethod requestMethod = RequestMethod.valueOf(request.getMethod().toUpperCase());

        log.debug("requestUri : {}, requestMethod : {}", requestURI, requestMethod);
        return handler.get(new HandlerKey(requestURI, requestMethod));
    }
}
LegacyHandlerMapping 클래스
public class LegacyHandlerMapping implements HandlerMapping {
    [..]

    @Override
    public Object getHandler(HttpServletRequest request) {
        return mapping.get(request.getRequestURI());
    }
}
DispatcherServlet 리팩토링
@WebServlet(name = "dispatcher", urlPatterns = "/", loadOnStartup = 1)
public class DispatcherServlet extends HttpServlet {
    private static final Logger log = LoggerFactory.getLogger(DispatcherServlet.class);

    private List<HandlerMapping> mappings = Lists.newArrayList();

    @Override
    public void init() throws ServletException {
        LegacyHandlerMapping lhm = new LegacyHandlerMapping();
        lhm.initMapping();

        AnnotationHandlerMapping ahm = new AnnotationHandlerMapping();
        ahm.initialize();

        mappings.add(lhm);
        mappings.add(ahm);
    }

    @Override
    protected void service(HttpServletRequest req, HttpServletResponse resp) throws ServletException, IOException {
        Object handler = getHandler(req);
        if(handler == null) {
            throw new IllegalArgumentException("존재하지 않는 URL입니다");
        }

        try {
            ModelAndView mav = execute(handler, req, resp);
            View view = mav.getView();
            view.render(mav.getModel(), req, resp);
        } catch (Exception e) {
            log.error("Exception : {}", e);
            throw new ServletException(e.getMessage());
        }
    }

    private ModelAndView execute(Object handler, HttpServletRequest req, HttpServletResponse resp) throws Exception {
        if(handler instanceof Controller) {
            return ((Controller)handler).execute(req, resp);
        } else {
            return ((HandlerExecution)handler).handle(req, resp);
        }
    }

    private Object getHandler(HttpServletRequest request) {
        for(HandlerMapping hm : mappings) {
            Object handler = hm.getHandler(request);
            if(handler != null) {
                return handler;
            }
        }

        return null;
    }
}
-두 개의 HandlerMapping 클래스가 모두 동작하도록 통합한다(AnnotationHandlerMapping과 LegacyHandlerMapping 클래스)
-HandlerMapping을 List로 관리하여 Request URI와 HTTP 메소드에 해당하는 컨트롤러를 찾아 컨트롤러가 존재할 경우 작업을 위임하도록 한다
AbstractNewController 생성, 그리고 Controller 리팩토링
좀 더 Controller에서 사용하기 쉽도록 추상 클래스를 정의하고 확장해서 사용할 수 있도록 한다
public abstract class AbstractNewController {
    protected ModelAndView jspView(String viewName) {
        return new ModelAndView(new JspView(viewName));
    }

    protected ModelAndView jsonView() {
        return new ModelAndView(new JsonView());
    }
}
@Controller, @RequestMapping 애노테이션을 사용하여 *Controller 클래스를 리팩토링 한다
@Controller
public class HomeController extends AbstractNewController {
    private final QuestionDao questionDao;

    @Inject
    public HomeController(QuestionDao questionDao) {
        this.questionDao = questionDao;
    }

    @RequestMapping(value = "/", method = RequestMethod.GET)
    public ModelAndView home(HttpServletRequest request, HttpServletResponse response) throws Exception {
        return jspView("home.jsp")
                .addAttribute("questions", questionDao.findAll());
    }
}
10.3 인터페이스가 다른 경우 확장성 있는 설계(p358, adapter 패턴)
목표✨
인터페이스로 추상화 가능한 부분을 찾아 2개의 프레임워크가 공존 가능하도록 리팩토링 수행한다
DispatcherServlet의 execute() 메서드의 경우 새로운 컨트롤러 유형이 추가될 경우 else if 절이 추가되는 구조로 되어있다
@WebServlet(name = "dispatcher", urlPatterns = "/", loadOnStartup = 1)
public class DispatcherServlet extends HttpServlet {
	[..]

	private ModelAndView execute(Object handler, HttpServletRequest req, HttpServletResponse resp) throws Exception {
      if(handler instanceof Controller) {
          return ((Controller)handler).execute(req, resp);
      } else {
          return ((HandlerExecution)handler).handle(req, resp);
      }
  }
}
→ 이 부분을 개선해 새로운 유형의 컨트롤러가 추가되더라도 서로 간의 영향을 주지 않으면서 확장할 수 있는 방법을 찾아보자
→ 우리가 해결해야 하는 문제는 여러 개의 프레임워크 컨트롤러를 하나로 통합해야 하는 것이다. 하지만 각 컨트롤러의 역할은 같다
① HandlerAdapter 인터페이스 생성
execute() 구현 로직은 컨트롤러의 인스턴스가 무엇인지를 판단하는 부분과 해당 컨트롤러로 캐스팅한 후 컨트롤러를 실행하는 부분으로 나뉜다. 이를 인터페이스로 추상화하면 아래와 같다
public interface HandlerAdapter {
    boolean support(Object handler);

    ModelAndView execute(Object handler, HttpServletRequest request, HttpServletResponse response) throws Exception;
}
② HandlerAdapter 구현체 생성
public class ControllerHandlerAdaptor implements HandlerAdapter {
    @Override
    public boolean support(Object handler) {
        return handler instanceof Controller;
    }

    @Override
    public ModelAndView execute(Object handler, HttpServletRequest request, HttpServletResponse response) throws Exception {
        return ((Controller)handler).execute(request, response);
    }
}
public class HandlerExecutionHandlerAdapter implements HandlerAdapter {
    @Override
    public boolean support(Object handler) {
        return handler instanceof HandlerExecution;
    }

    @Override
    public ModelAndView execute(Object handler, HttpServletRequest request, HttpServletResponse response) throws Exception{
        return ((HandlerExecution)handler).handle(request, response);
    }
}
③ DispatcherServlet 리팩토링
execute() 메서드 리팩토링
@WebServlet(name = "dispatcher", urlPatterns = "/", loadOnStartup = 1)
public class DispatcherServlet extends HttpServlet {
    [..]

    private List<HandlerAdapter> adapters = Lists.newArrayList();

    @Override
    public void init() throws ServletException {
    	// ..

    	// 신규 컨트롤러 추가시 아래와 같이 구현체를 추가해주면 된다
        adapters.add(new ControllerHandlerAdaptor());
        adapters.add(new HandlerExecutionHandlerAdapter());
    }

    [..]

    private ModelAndView execute(Object handler, HttpServletRequest req, HttpServletResponse resp) throws Exception {
        for(HandlerAdapter adapter : adapters) {
            if(adapter.support(handler)) {
                return adapter.execute(handler, req, resp);
            }
        }

        return null;
    }

}
10.4 배포 자동화를 위한 쉘 스크립트 개선
https://dev-ljw1126.tistory.com/398
[Next Step] 10.4 배포 자동화를 위한 쉘 스크립트 개선 (p362) 정리
목차 요구사항 소스 코드를 배포한 후 문제가 발생할 경우 빠르게 원복(롤백, rollback)할 수 있는 환경을 구축한다 ① 배포 스크립트( deploy.sh ) 개선 ② 원복(롤백) 스크립트( rollback.sh) 구현 참고.
dev-ljw1126.tistory.com
'독서 > 📚' 카테고리의 다른 글
| [Next Step] 12장 확장성 있는 DI 프레임워크로 개선 (0) | 2023.11.23 |
|---|---|
| [Next Step] 11장 의존관계 주입(DI)을 통합 테스트 하기 쉬운 코드 만들기 (1) | 2023.11.21 |
| [Next Step] 9장 두 번째 양파 껍질을 벗기기 위한 중간 점검 (0) | 2023.11.18 |
| [Next Step] 8장 Ajax를 활용해 새로고침 없이 데이터 갱신하기 (0) | 2023.11.17 |
| [Next Step] 7장 DB를 활용해 데이터를 영구적으로 저장하기 (1) | 2023.11.17 |
포스팅이 좋았다면 "좋아요❤️" 또는 "구독👍🏻" 해주세요!
![[Next Step] 12장 확장성 있는 DI 프레임워크로 개선](https://img1.daumcdn.net/thumb/R750x0/?scode=mtistory2&fname=https%3A%2F%2Fblog.kakaocdn.net%2Fdna%2FXhEr5%2FbtsAMsNXzzU%2FAAAAAAAAAAAAAAAAAAAAAElqzxglpi4f8MN3hZMZIYdLjvnWP6wxrWI_rFG4rV7U%2Fimg.png%3Fcredential%3DyqXZFxpELC7KVnFOS48ylbz2pIh7yKj8%26expires%3D1772290799%26allow_ip%3D%26allow_referer%3D%26signature%3Dckc%252BTzNl4ml3pu34%252Foe1KGsV6Z0%253D)
![[Next Step] 11장 의존관계 주입(DI)을 통합 테스트 하기 쉬운 코드 만들기](https://img1.daumcdn.net/thumb/R750x0/?scode=mtistory2&fname=https%3A%2F%2Fblog.kakaocdn.net%2Fdna%2FcHXYkc%2FbtsAFy1SF6a%2FAAAAAAAAAAAAAAAAAAAAAKUku5AlHSEx86Z1zk6ZuH25ee4anfFcv63nYWSkL9O0%2Fimg.png%3Fcredential%3DyqXZFxpELC7KVnFOS48ylbz2pIh7yKj8%26expires%3D1772290799%26allow_ip%3D%26allow_referer%3D%26signature%3DLqTxJDl52KFaq2wCL5LacKO%252B1l0%253D)
![[Next Step] 9장 두 번째 양파 껍질을 벗기기 위한 중간 점검](https://img1.daumcdn.net/thumb/R750x0/?scode=mtistory2&fname=https%3A%2F%2Fblog.kakaocdn.net%2Fdna%2FcqMDIv%2FbtsAvVQUAkX%2FAAAAAAAAAAAAAAAAAAAAADSJJxJU1NVHj7No_erTTsJjMGsU3CS1JwhRINQOTBzZ%2Fimg.png%3Fcredential%3DyqXZFxpELC7KVnFOS48ylbz2pIh7yKj8%26expires%3D1772290799%26allow_ip%3D%26allow_referer%3D%26signature%3DfCUsi2kDDBaPWRHZ3HJCAbYhEOM%253D)
![[Next Step] 8장 Ajax를 활용해 새로고침 없이 데이터 갱신하기](https://img1.daumcdn.net/thumb/R750x0/?scode=mtistory2&fname=https%3A%2F%2Fblog.kakaocdn.net%2Fdna%2FyoXTn%2FbtsAws1VTPm%2FAAAAAAAAAAAAAAAAAAAAAKV5GkDAaCJhzzlTa0SYYOmWRaiZm7hbmc1PTd_ctxgZ%2Fimg.png%3Fcredential%3DyqXZFxpELC7KVnFOS48ylbz2pIh7yKj8%26expires%3D1772290799%26allow_ip%3D%26allow_referer%3D%26signature%3DndFLhtoKNhdAnRPAOwFtRFPkO%252F4%253D)