![[JUnit] JUnit4, JUnit5 어노테이션 비교 (생명주기, ParameterizedTest, Suite 등등)](https://img1.daumcdn.net/thumb/R750x0/?scode=mtistory2&fname=https%3A%2F%2Fblog.kakaocdn.net%2Fdn%2FwKfGg%2FbtsrR2pUkeg%2F8essUSEIE6VWtCy4Guo8v0%2Fimg.png)


목차
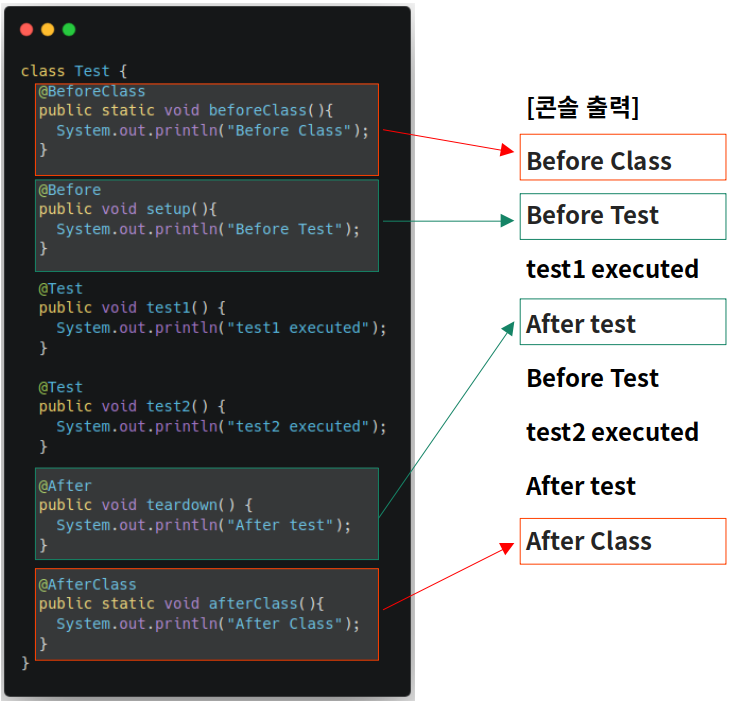
JUnit 생명 주기 Annotation
- 명칭만 변경
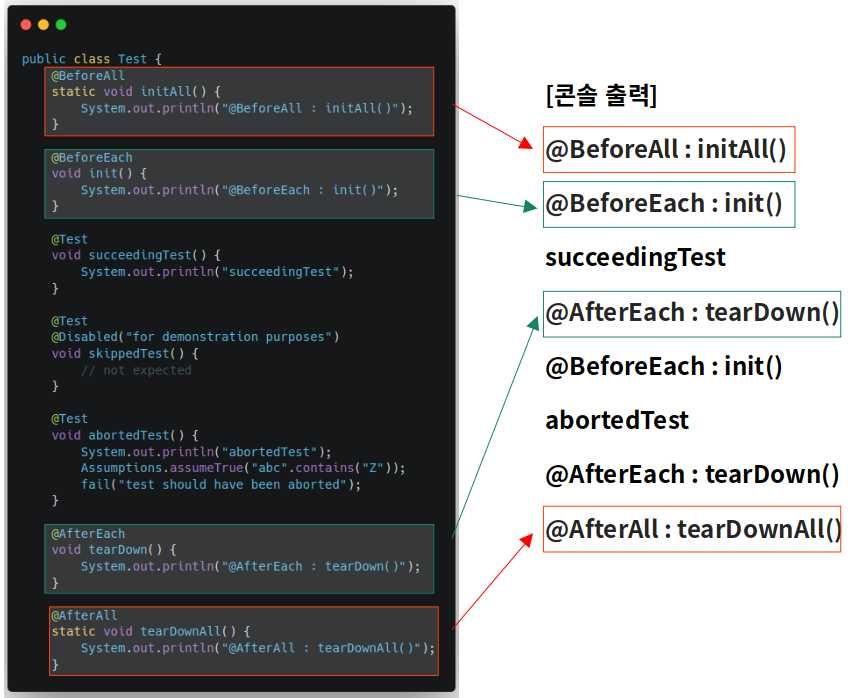
- @BeforeAll, @AfterAll : 클래스 단위로 시작과 종료 시점에 한번만 실행
- @BeforeEach, @AfterEach : 메서드 단위로 각 메서드의 시작과 종료 시점에 실행
| JUnit4 | Junit5 |
| @BeforeClass | @BeforeAll |
| @Before | @BeforeEach |
| @After | @AfterEach |
| @AfterClass | @AfterAll |
Junit4
Juint5
@Test
Junit4 @Test
timeout 과 예외 처리 관련 메타 속성이 정의되어 있었다
@Retention(RetentionPolicy.RUNTIME)
@Target({ElementType.METHOD})
public @interface Test {
    Class<? extends Throwable> expected() default None.class;

    long timeout() default 0L;

    public static class None extends Throwable {
        private static final long serialVersionUID = 1L;

        private None() {
        }
    }
}
timeout
- 테스트 코드 실행 시간 내에 수행 완료되는지 확인
- 아래의 코드의 경우 15ms 정도 걸리는데 timeout = 10 (ms) 로 지정하여 TestTimedOutException 에러가 발생한다
org.junit.runners.model.TestTimedOutException: test timed out after 10 milliseconds
@Test(timeout=10)
public void testSort_Performance(){
    int array[] = {12,23,4};
    for(int i=1;i<=1000000;i++)
    {
        array[0] = i;
        Arrays.sort(array);
    }
}
expected
예상 에러가 발생하는지 확인한다
@Test(expected=NullPointerException.class)
public void testArraySort_NullArray() {
    int[] numbers = null;
    Arrays.sort(numbers);
}
Junit5 @Test
- 마커 어노테이션(Marker Annotation) 으로 변경
- timeout, expected의 경우 @Timeout 이나 API Method로 대체
@Target({ ElementType.ANNOTATION_TYPE, ElementType.METHOD })
@Retention(RetentionPolicy.RUNTIME)
@Documented
@API(status = STABLE, since = "5.0")
@Testable
public @interface Test {
}
timeout
@Timeout Annotation 사용하는 경우
@Target({ ElementType.TYPE, ElementType.METHOD })
@Retention(RetentionPolicy.RUNTIME)
@Documented
@Inherited
@API(status = STABLE, since = "5.7")
public @interface Timeout {

	/**
	 * The duration of this timeout.
	 *
	 * @return timeout duration; must be a positive number
	 */
	long value();

	/**
	 * The time unit of this timeout.
	 *
	 * @return time unit
	 * @see TimeUnit
	 */
	TimeUnit unit() default TimeUnit.SECONDS; // 기본 초 단위

}
각 테스트 메서드 별로 지정하는 경우
public class TimeoutTest {

    @DisplayName("")
    @Test
    @Timeout(1)
    void timeout() throws InterruptedException {
        Thread.sleep(10000);
    }

    @DisplayName("unit 으로 시간 단위를 지정할 수 있다")
    @Test
    @Timeout(value = 1, unit = TimeUnit.MINUTES)
    void timoutByMinutes() throws InterruptedException {
        Thread.sleep(2 * 60 * 1000);
    }
}
클래스에 지정시 각 테스트별 5초로 제한 가능
총 10sec 20ms 실행시간으로 보아 5 sec 씩 테스트 확인하고, 20ms 는 자원 해제
@Timeout(5) // 테스트별 5초 안에 안 끝나면 timeout() timed out after 5 seconds 에러 출력
public class TimeoutTest {

    @DisplayName("")
    @Test
    void timeout() throws InterruptedException {
        Thread.sleep(10000);
    }

    @DisplayName("unit 으로 시간 단위를 지정할 수 있다")
    @Test
    void timoutByMinutes() throws InterruptedException {
        Thread.sleep(2 * 60 * 1000);
    }
}
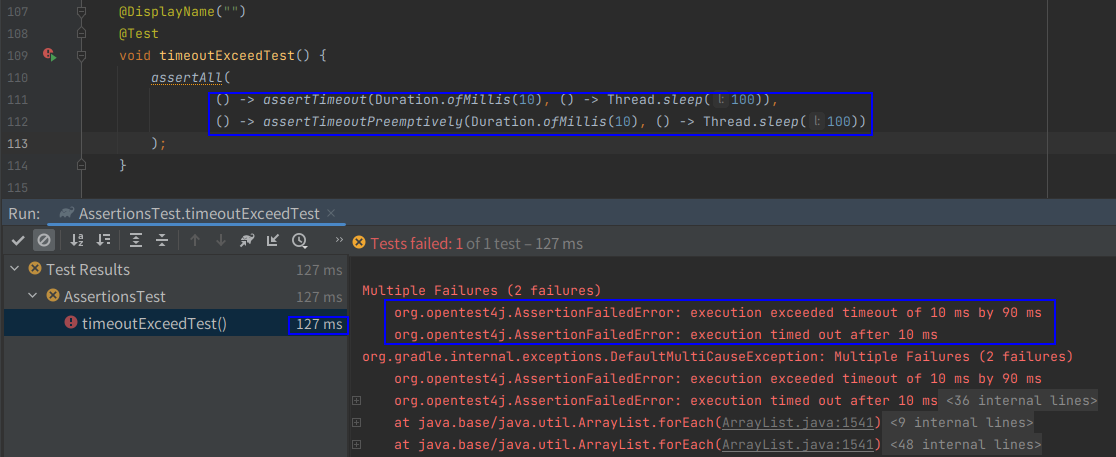
org.junit.jupiter.api.Assertions API 사용하는 경우
- assertTimeout : 특정시간 안에 테스트가 끝나는지 확인, 시간 초과 하더라도 실행 메서드가 끝난 후 결과 리턴
- assertTimeoutPreemptively : 특정시간 안에 테스트가 끝나지 않을 경우 바로 강제 종료
@Test
void timeoutExceedTest() {
assertAll(
        () -> assertTimeout(Duration.ofMillis(10), () -> Thread.sleep(100)),
        () -> assertTimeoutPreemptively(Duration.ofMillis(10), () -> Thread.sleep(100))
);
expected
@Test에 메타 속성이 없어지고, 아래 두 가지로 예외 처리 가능
- org.junit.jupiter.api.Asserstions.assertThrows()
- org.assertj.core.api.Assertions.assertThatThrownBy() -- 개인적으로 좀 더 선호
assertThrows()
@Test
void exceptionTesting() {
    Exception exception = assertThrows(ArithmeticException.class,
            () -> Calculator.DIVIDE.apply(1, 0));
    assertEquals("/ by zero", exception.getMessage());
}
assertThatThrownBy()
@Test
void assertThatThrownBy() {
    Assertions.assertThatThrownBy(() -> Calculator.DIVIDE.apply(1, 0))
            .isInstanceOf(ArithmeticException.class)
            .hasMessage("/ by zero");

    Assertions.assertThatThrownBy(() -> Optional.of(null))
            .isInstanceOf(NullPointerException.class);
}
참고. https://www.baeldung.com/junit-assert-exception
Parameterized Test
하나의 테스트에서 값을 여러 개 바꿔서 실행하고 싶을때 사용
JUnit4
- 클래스 상단 @RunWith(Parameterized.class) 선언
- 클래스 멤버 필드, 생성자 정의
- @Parameter 선언한 method 에서 멤버 필드 순서에 맞게 파라미터 선언
- @Test 에서는 클래스 멤버 필드 사용하여 테스트 수행
@RunWith(Parameterized.class) // #1
public class StringHelperParameterizedTest {
	StringHelper helper = new StringHelper(); // 임의 유틸 클래스

        // #2
	private String input;
	private String expectedOutput;

	public StringHelperParameterizedTest(String input, String expectedOutput) {
		this.input = input;
		this.expectedOutput = expectedOutput;
	}

	// #3
	@Parameters
	public static Collection<String[]> testConditions() {
		String expectedOutputs[][] = {
				{ "AACD", "CD" },
				{ "ACD", "CD" } };
		return Arrays.asList(expectedOutputs);
	}


	// input = AACD, expectedOutput = CD
	// input = ACD, expectedOutput = CD
	@Test
	public void testTruncateAInFirst2Positions() {
		assertEquals(expectedOutput,
				helper.truncateAInFirst2Positions(input));
	}
}
JUnit5
- @ValueSource : primitive type 데이터 직접 입력
- @EnumSource : enum 클래스 사용
- @MethodSource : Stream 타입 반환하는 factory method 지정 사용
- @CsvSource : csv 유형 데이터 직접 입력하여 사용
- @CsvFileSource : csv 파일 데이터 사용
- @ArgumentsSrouce : ArgumentsProvider 구현 클래스의 factory method 사용
참고. JUnit5 User Guide (2.16. Parameterized Tests)
https://junit.org/junit5/docs/current/user-guide/#writing-tests-parameterized-tests
JUnit 5 User Guide
Although the JUnit Jupiter programming model and extension model do not support JUnit 4 features such as Rules and Runners natively, it is not expected that source code maintainers will need to update all of their existing tests, test extensions, and custo
junit.org
@Test대신 @ParameterizedTest 사용해야 하는 것과, 각 Annotation 메타 속성에 따라 제어해야 하는게 눈에 띈다
예약어가 정해져 있기 때문에 @ParameterizedTest 메타 속성으로 테스트 명칭을 커스텀 하는 것이 가능했다
몇 가지 Source만 살펴보도록 하였다 (나머진 공식 문서 가이드 참고)
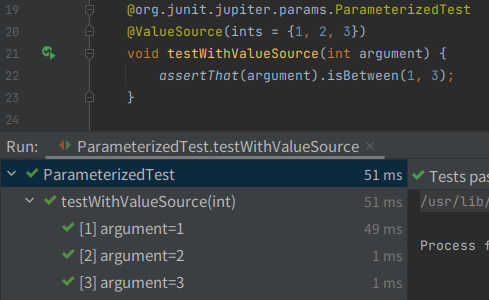
@ValueSource
- short / byte / int / long / float / double / char / boolean/ String / Class 지원
@org.junit.jupiter.params.ParameterizedTest
@ValueSource(ints = {1, 2, 3})
void testWithValueSource(int argument) {
    assertThat(argument).isBetween(1, 3); // ok
}
@EnumSource
- 기본 모드는 INCLUDE(그 외 EXCLUDE, MATCH_ALL, MATCH_ANY )
- 메타 속성 value, name 지정하여 Enum 클래스에 원하는 파라미터만 호출하도록 제어 가능
@DisplayName("Enum 클래스 파라미터 전체 테스트를 수행한다")
@org.junit.jupiter.params.ParameterizedTest
@EnumSource(ChronoUnit.class)
void testWithEnumSourceWithAutoDetection(ChronoUnit unit) {
    assertThat(unit).isNotNull();
}

@DisplayName("지정한 ENUM 파라미터만 테스트 가능하다")
@org.junit.jupiter.params.ParameterizedTest
@EnumSource(names = {"DAYS", "HOURS"}) // default INCLUDE mode
void testWithEnumSourceInclude(ChronoUnit unit) {
    EnumSet<ChronoUnit> units = EnumSet.of(ChronoUnit.DAYS, ChronoUnit.HOURS);

    assertThat(units.contains(unit)).isTrue();
}

@DisplayName("EXCLUDE 모드로 파라미터 제외 할 수 있다")
@org.junit.jupiter.params.ParameterizedTest
@EnumSource(mode = EXCLUDE, names = {"ERAS", "FOREVER"})
void testWithEnumSourceExclude(ChronoUnit unit) {
    EnumSet<ChronoUnit> units = EnumSet.of(ChronoUnit.ERAS, ChronoUnit.FOREVER);

    assertThat(units.contains(unit)).isFalse();
}
@MethodSource
- 사용자가 작성한 factory method 호출하여 파라미터로 사용
- factory method 는 정적(static) method이고 Stream 타입의 데이터 소스를 리턴함
- @MethodSource 메타 필드로 String[] value 하나만 존재하며, 메서드를 여러개 지정하는게 가능한 것으로 생각됨
@org.junit.jupiter.params.ParameterizedTest
@MethodSource("stringProvider")
void testWithExplicitLocalMethodSource(String arg) {
    assertThat(arg).isNotNull();
}

static Stream<String> stringProvider() {
    return Stream.of("apple", "banana");
}
factory method를 지정하지 않을 경우, 테스트 method 명과 같은 factory method를 호출
@DisplayName("MethodSource를 지정하지 않으면 테스트 함수 명과 동일한 factory method를 호출한다")
@org.junit.jupiter.params.ParameterizedTest
@MethodSource
void testWithDefaultLocalMethodSource(String arg) {
    assertThat(arg).isNotNull();
}

static Stream<String> testWithDefaultLocalMethodSource() {
    return Stream.of("apple", "banana");
}
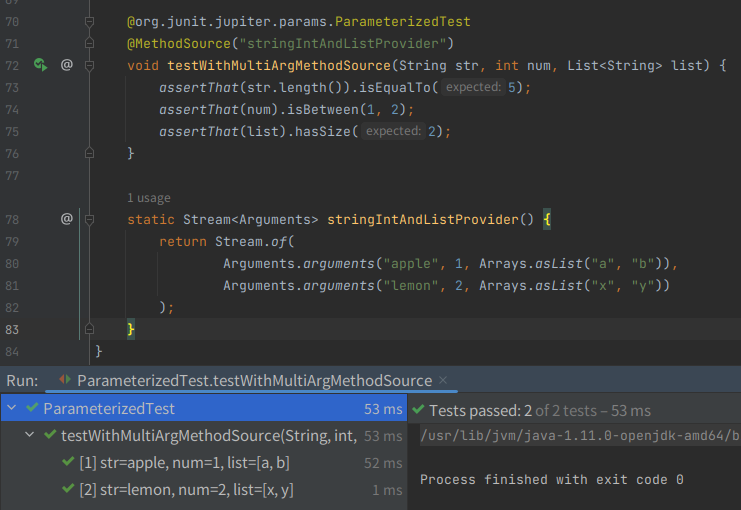
파라미터 타입이 여러개 인 경우 Stream<Arguments> 를 사용
@org.junit.jupiter.params.ParameterizedTest
@MethodSource("stringIntAndListProvider")
void testWithMultiArgMethodSource(String str, int num, List<String> list) {
    assertThat(str.length()).isEqualTo(5);
    assertThat(num).isBetween(1, 2);
    assertThat(list).hasSize(2);
}

static Stream<Arguments> stringIntAndListProvider() {
    return Stream.of(
            Arguments.arguments("apple", 1, Arrays.asList("a", "b")),
            Arguments.arguments("lemon", 2, Arrays.asList("x", "y"))
    );
}
Suite
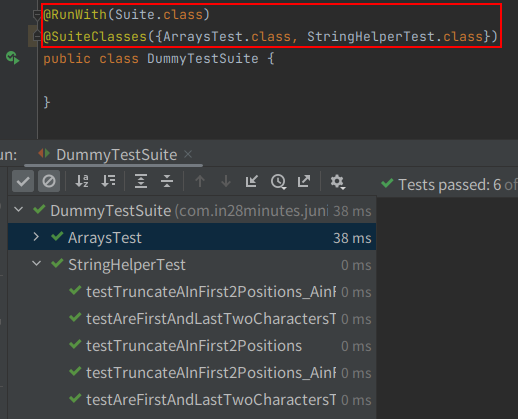
JUnit4 의 경우
아래와 같이 설정 후 실행하면 @SuiteClasses에 해당되는 테스트 클래스가 실행된다
JUnit5 의 경우
의존성 추가(build.gradle)
//junit suite annotation
testImplementation 'org.junit.platform:junit-platform-suite:1.9.2'
@SelectePackages 사용해서 패키지 전체 테스트 실행 가능하다
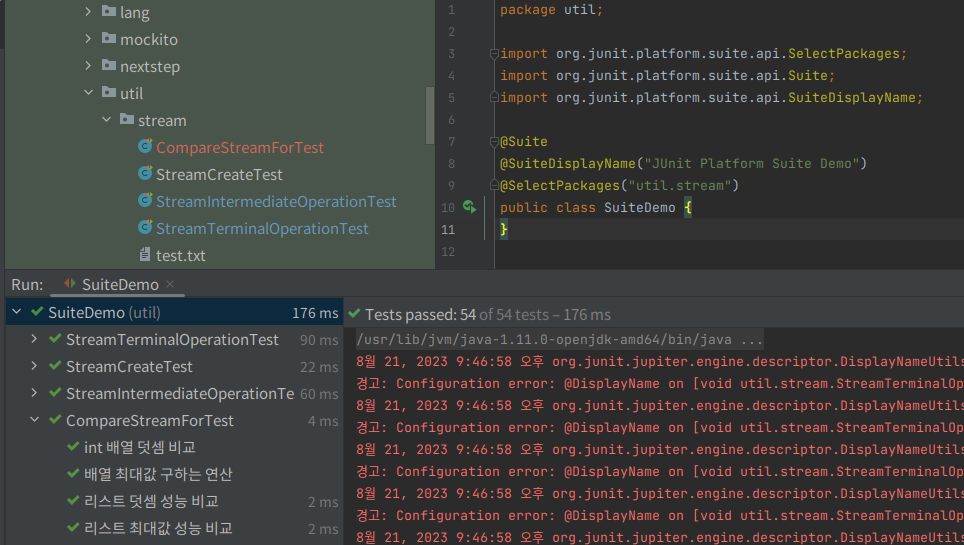
@IncludeClassNamePatterns처럼 정규식으로 파일명을 포함하거나, 다른 Annotation 을 사용하면 제외 가능하다
좀 더 자세한 설정의 경우 아래 API doc 살펴보고 찾아보기로
공식. org.junit.platform.sutie.api package
org.junit.platform.suite.api (JUnit 5.10.0 API)
package org.junit.platform.suite.api Annotations for configuring a test suite on the JUnit Platform. JUnit 4 Suite Support Test suites can be run on the JUnit Platform in a JUnit 4 environment via @RunWith(JUnitPlatform.class) with the junit-platform-runne
junit.org
https://junit.org/junit5/docs/current/user-guide/#junit-platform-suite-engine-example
JUnit 5 User Guide
Although the JUnit Jupiter programming model and extension model do not support JUnit 4 features such as Rules and Runners natively, it is not expected that source code maintainers will need to update all of their existing tests, test extensions, and custo
junit.org
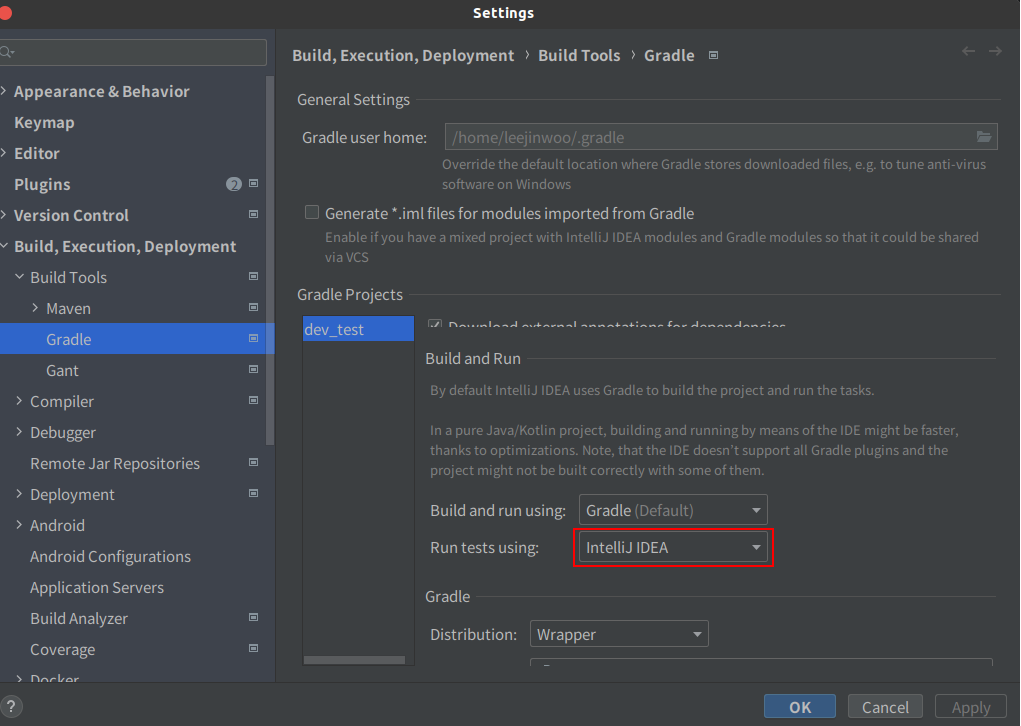
참고. JUnit5 @DisplayName 표시되지 않을 경우 (인텔리제이)
- Setting > Gradle 에서 아래와 같이 IntelliJ IDEA로 수정 후 테스트 재실행
Assertions, Assumptions
JUnit4 Assert, Assume 의 경우 JUnit 5에서 아래와 같이 대체 된 것으로 확인된다.
| JUnit4 | JUnit5 |
| org.junit.Assert | org.junit.jupiter.api.Assertions |
| org.junit.Assume | org.junit.jupiter.api.Assumptions |
https://dev-ljw1126.tistory.com/331
JUnit5 Assertions, Assumptions
목차 JUnit4 Assert, Assume Assert, Assume 의 경우 JUnit 5에서 아래와 같이 대체가 된 것으로 확인된다. JUnit4 JUnit5 org.junit.Assert org.junit.jupiter.api.Assertions org.junit.Assume org.junit.jupiter.api.Assumptions 개인적으로
dev-ljw1126.tistory.com
참고
https://jinioh88.tistory.com/57
https://www.baeldung.com/java-junit-5-timeout-annotation
https://junit.org/junit5/docs/current/user-guide/#migrating-from-junit4-tips
'공부 > Junit' 카테고리의 다른 글
| [JUnit5] 테스트 메서드 그룹화/실행 순서 (@Nested, @TestMethodOrder) (0) | 2023.08.26 |
|---|---|
| JUnit5 Assertions, Assumptions (0) | 2023.08.11 |
포스팅이 좋았다면 "좋아요❤️" 또는 "구독👍🏻" 해주세요!
![[JUnit5] 테스트 메서드 그룹화/실행 순서 (@Nested, @TestMethodOrder)](https://img1.daumcdn.net/thumb/R750x0/?scode=mtistory2&fname=https%3A%2F%2Fblog.kakaocdn.net%2Fdn%2FdFxxZS%2FbtssgtVdFBe%2F9Mux60qYPKjgvO6KDM4ZN1%2Fimg.png)
